Online Image Converter
Convert JPEG, PNG, BMP and more
YOUR AD GOES HERE
Image Quality
This parameter only applies to JPEG, WEBP, and HEIC images and will be ignored otherwise. The better the quality, the bigger the file size. And the lower the quality, the smaller the file size.
YOUR AD GOES HERE
tarual.com Image Converter — A Complete Guide (With Screenshots)
Convert images fast, clean, and without guesswork. This guide walks you through every step you’ll see on the page: uploading files, choosing a target format, adjusting quality (when available), converting, and downloading results.
What the Image Converter Does
The Image Converter on tarual.com is a simple, browser-based tool that helps you change an image from one format to another. Instead of installing heavy software or opening desktop editors just to “save as PNG,” you can upload your images, pick the format you need, optionally adjust quality for certain formats, and download the converted result.
This matters more than people think. Image formats aren’t just different file extensions; they affect:
- File size (important for website speed and sharing)
- Quality (how sharp your image looks after saving)
- Transparency (PNG and WEBP can keep it; JPEG can’t)
- Compatibility (some apps only accept specific types)
- Workflow (designers, developers, and marketers often need different formats for different tools)
The tarual.com converter supports converting common raster formats (like JPEG and PNG), modern web formats (like WEBP), and several special-purpose formats (like ICO for icons). It also includes formats used in design workflows (like PSD and AI) as targets in the “Convert to” list, which is helpful when you’re standardizing files or preparing assets for a specific pipeline.
Who It’s For (Real-World Use Cases)
An image converter isn’t just a “nice-to-have” tool. It’s one of those utilities you end up using constantly once you’re building anything online. Here are common scenarios where tarual.com’s Image Converter can save you time:
1) Website owners and bloggers
If you run a website, images are often the biggest files on your pages. Converting photos to a more efficient format can reduce load time, improve user experience, and help performance scores. For many websites, converting large PNGs to JPEG or WEBP is one of the fastest improvements you can make.
2) E-commerce sellers
Marketplaces and product listing platforms sometimes demand specific formats. For example, you may need JPEGs for catalog photos, PNGs for images with transparent backgrounds, and WEBP for modern site performance. Converting and standardizing your images also makes product pages feel consistent and professional.
3) Designers and content creators
Design assets move between tools: Photoshop, Illustrator, web editors, email builders, and social platforms. Sometimes you need to turn a file into PNG for transparency, JPEG for quick sharing, or PDF for print-friendly delivery. A converter makes these transitions smoother—especially for quick “export and send” tasks.
4) Developers
Developers often need to prepare icons (ICO), optimize assets, or convert screenshots into the right format for documentation. When you’re shipping a web app, every KB matters, and having a quick converter helps you keep assets lean.
5) Students and office workflows
Some school portals or office systems accept only certain formats, or they reject files that exceed size limits. Converting (and adjusting quality when available) can turn a frustrating upload into a one-minute fix.
Supported Formats and What They Mean
On the Image Converter page you’ll see a “Convert to” dropdown that includes a variety of output formats. Understanding them helps you pick the best one for your goal—not just “any format that works.”
JPEG
JPEG is the classic format for photos. It compresses well and usually gives small file sizes, which is great for web pages and sharing. The trade-off is that JPEG uses “lossy compression,” meaning some detail is discarded to reduce size, and it does not support transparency.
Choose JPEG when you have photographs or complex images without transparency and you want a smaller file.
PNG
PNG supports transparency and keeps crisp edges well, which is why it’s popular for logos, UI screenshots, diagrams, and images where you need a clean background. PNG can be larger than JPEG for photos, but it’s excellent when you need transparent areas or sharp text.
WEBP
WEBP is a modern web-friendly format designed to keep quality high while reducing file sizes. Many sites use WEBP for faster loading. It can support transparency too. If your platform supports it, WEBP is often a top choice for performance.
GIF
GIF is best known for simple animations and very limited colors. For still images, GIF is usually not ideal unless the image is extremely simple (like a flat-color graphic) or you specifically need GIF for compatibility.
BMP
BMP is an older bitmap format often used for compatibility with certain systems. It tends to be large because it’s not designed for efficient compression. Most users don’t choose BMP for web publishing, but it can be useful for specific software workflows that expect BMP.
TIFF
TIFF is commonly used in print and professional imaging workflows. It can preserve high quality and detail. TIFF files can be large, so it’s more for archiving or professional use than everyday web publishing.
HEIC
HEIC (High Efficiency Image Container) is a format often produced by modern phones, especially in certain ecosystems. It can store high-quality images at smaller sizes. Some platforms still don’t accept HEIC directly, which is why people convert HEIC to JPEG or PNG. On the flip side, you might convert into HEIC for storage efficiency if your workflow supports it.
ICO
ICO is the format used for icons—like website favicons or application icons. It’s useful when you need an icon file that works across systems that recognize ICO specifically.
PDF is a document format, but it can contain images. Converting an image to PDF is useful when you want a single file that’s easy to share, print, or upload to a system that expects documents rather than images.
PSD and AI
PSD (Photoshop Document) and AI (Adobe Illustrator) are popular design formats used by professionals. Depending on the specific converter behavior and what your uploaded file contains, converting to these formats may be intended for certain workflows (for example: standardizing downloads or preparing assets for a design pipeline).
Note: When you’re converting from simple raster images (like JPEG/PNG) into design file types (like PSD/AI), the result typically won’t magically recreate layers or vectors. In most cases, it becomes an embedded image inside that container format. If your goal is editable layers or true vector paths, you usually need a dedicated editor and the original source files.
How to Use the Tool (Step-by-Step With Images)
Let’s walk through exactly what you’ll do on the Image Converter page on tarual.com. The screenshots below match the flow a typical user sees: upload → file appears → choose target format → adjust quality if needed → convert → download.
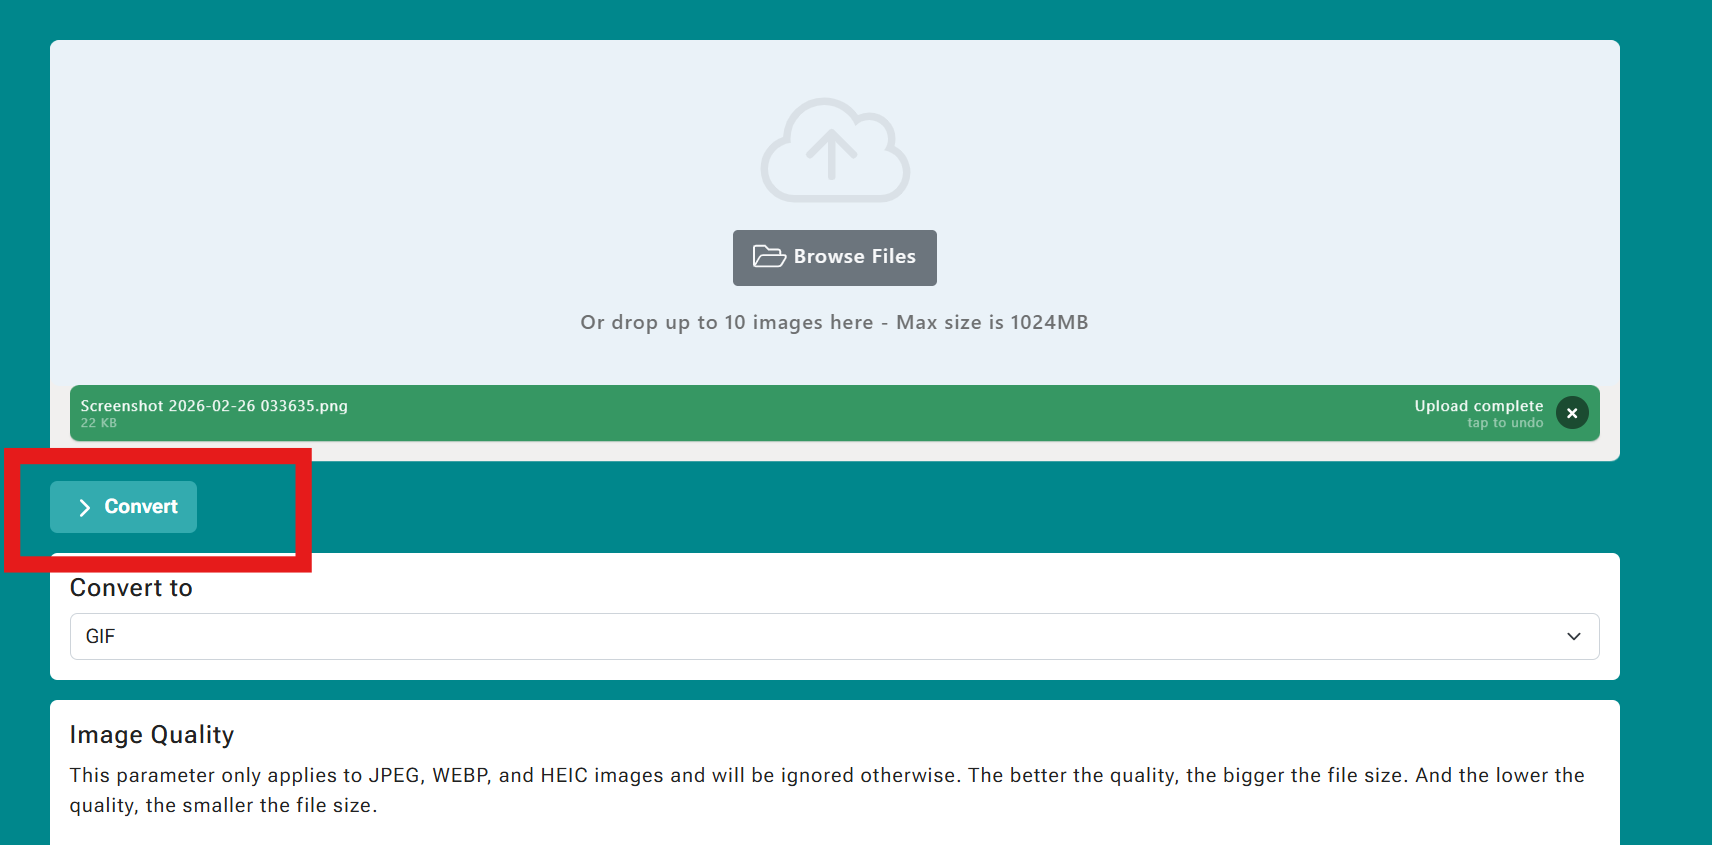
Step 1: Upload images
At the top of the tool area, you’ll see a large upload box. You can click Browse Files to pick images from your device, or you can drag and drop images into the upload area.
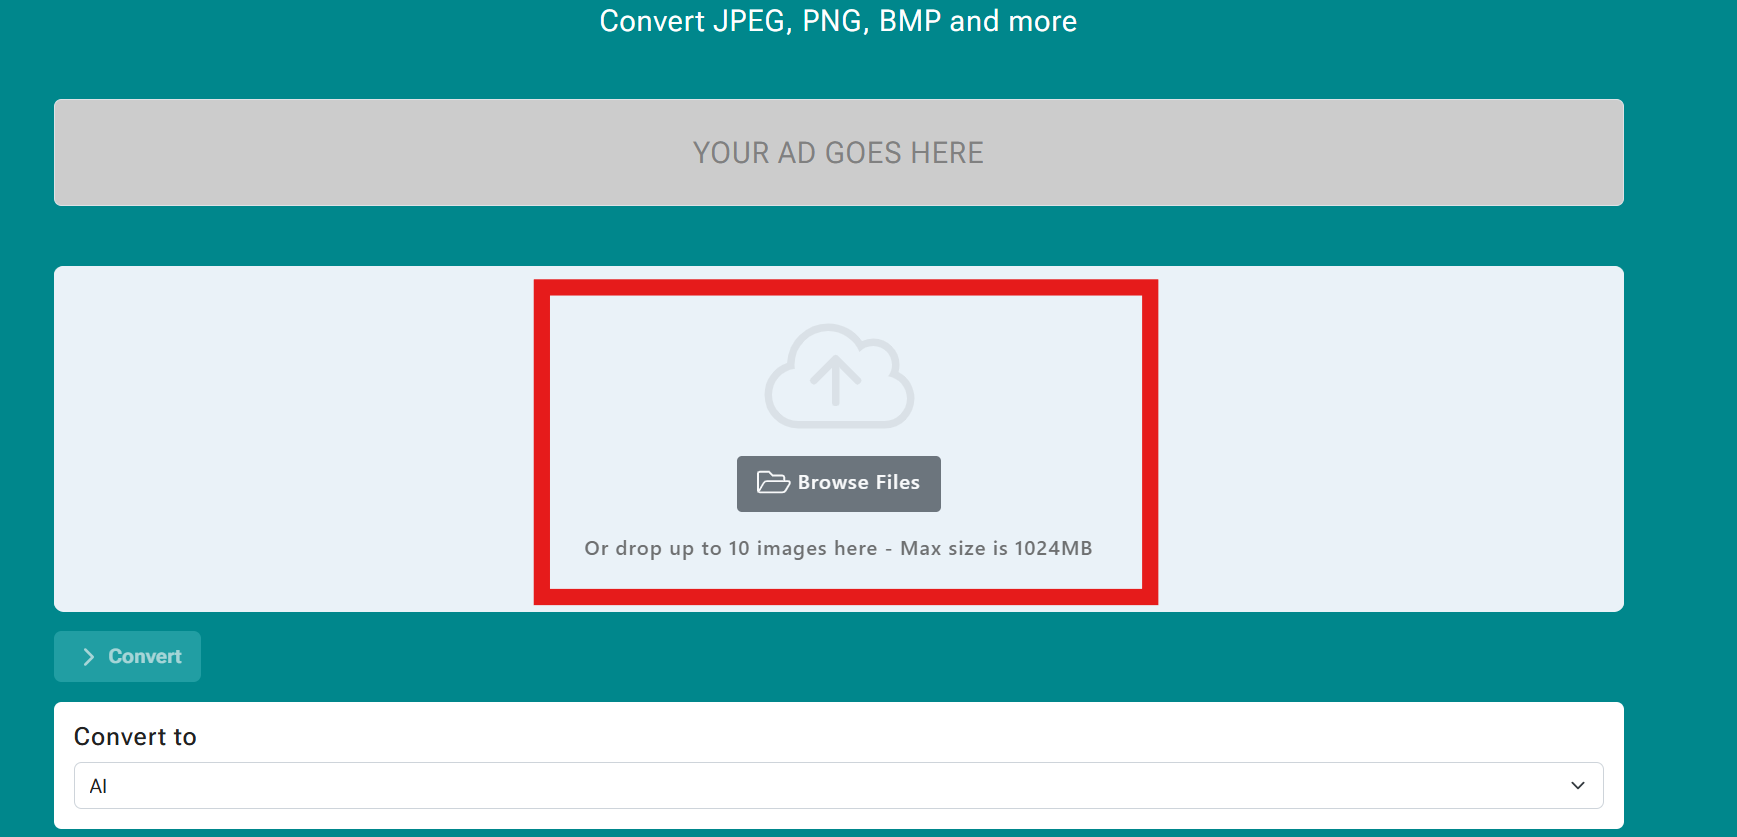
The tool supports batch uploads: you can add up to 10 images at a time. That’s great when you want to convert a folder of photos, a set of product images, or multiple screenshots in one go.
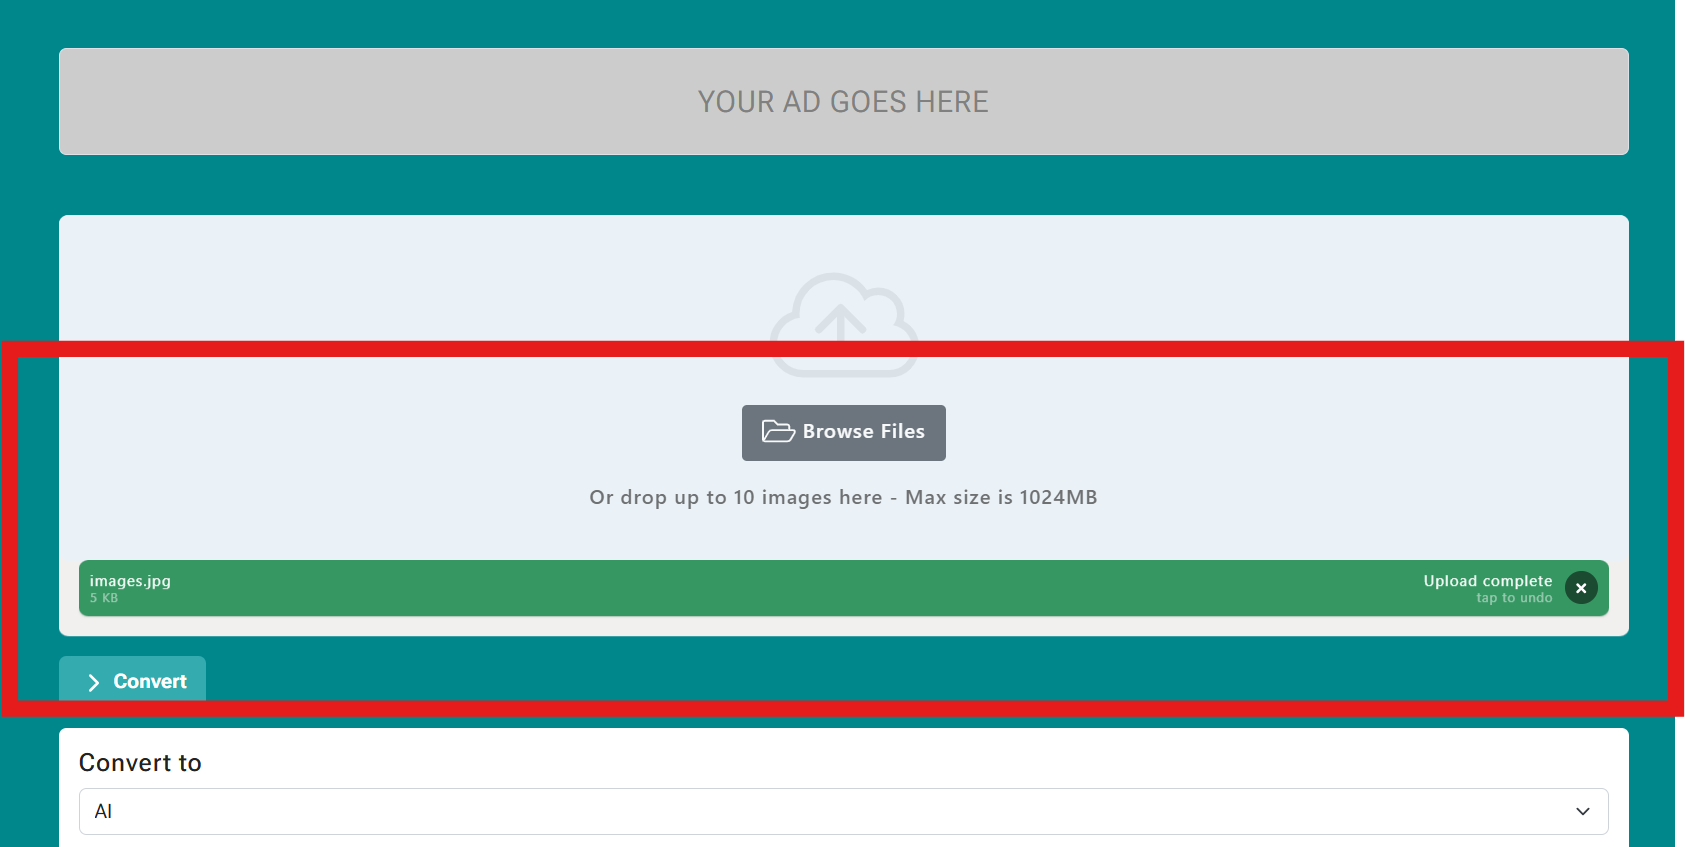
After selecting files, the page will show an upload status. When everything is ready, you’ll see a confirmation like “Upload complete.”
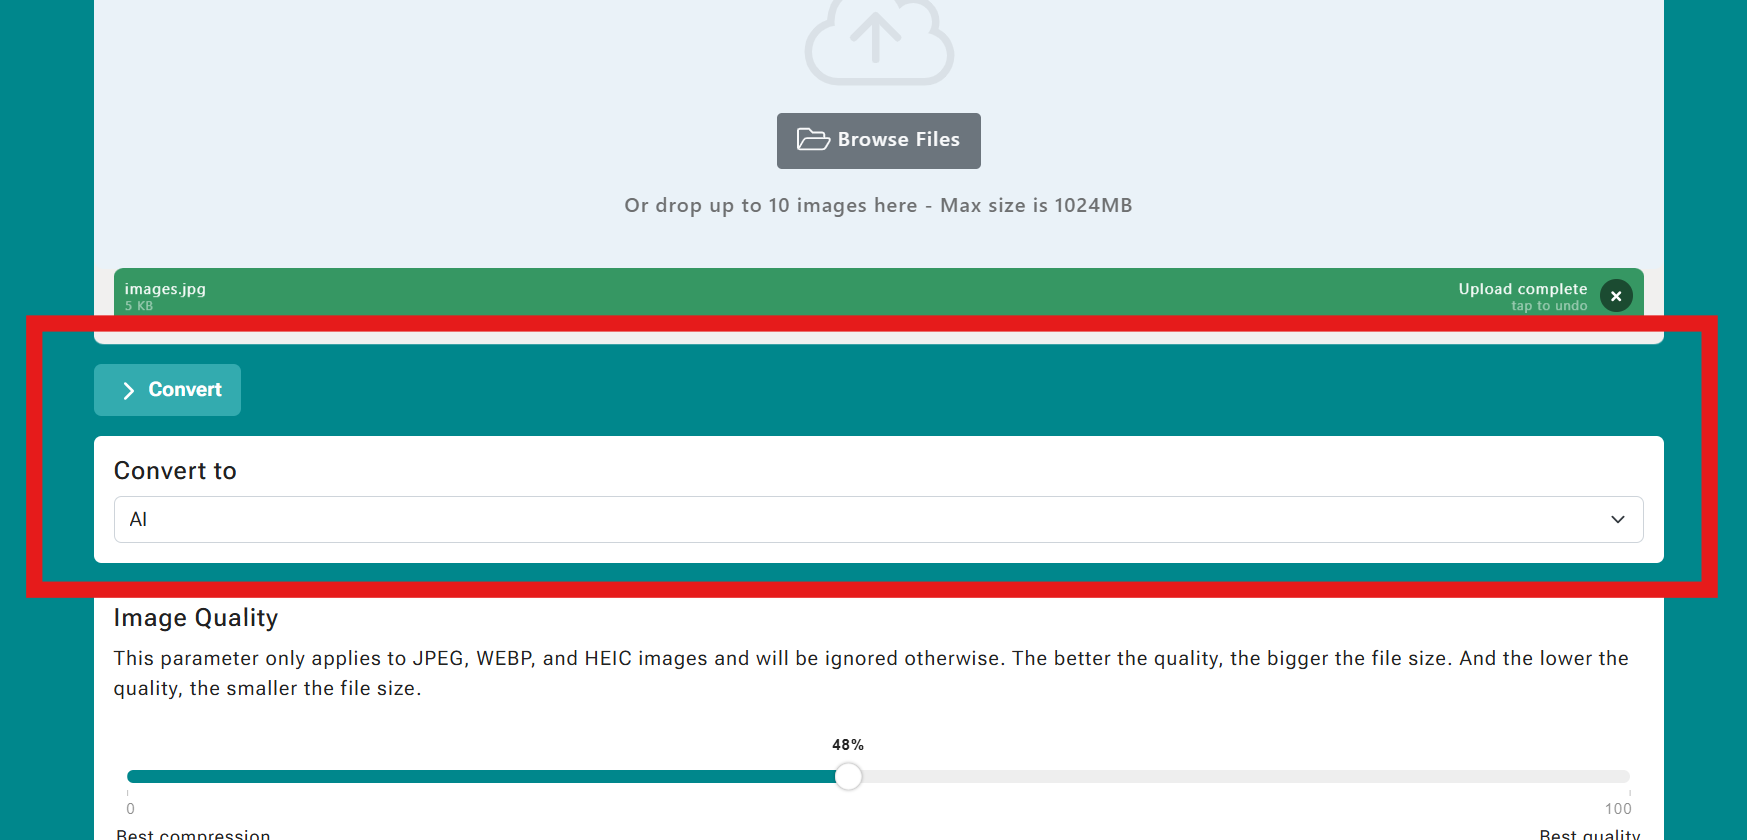
Step 2: Choose what format to convert to
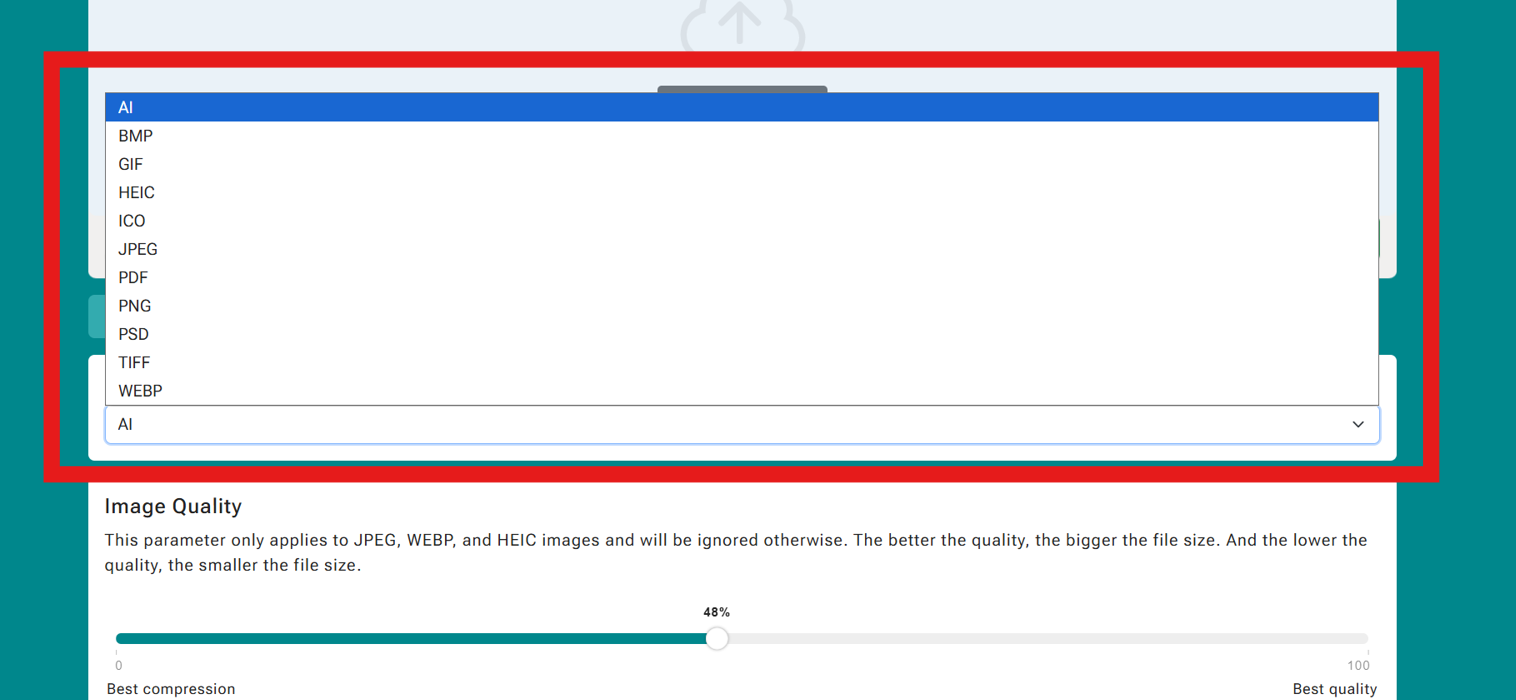
Once your file is uploaded, scroll (or look just below the upload area) to find the Convert to option. This is where you pick the target format you want to create—like JPEG, PNG, PDF, WEBP, GIF, and so on.
Click the dropdown to see all available formats. Pick the one that matches your goal:
- JPEG for photos and smaller file sizes
- PNG for transparency, crisp text, and logos
- WEBP for modern web optimization
- PDF for document-style sharing and printing
- ICO for icons (favicons and app icons)
- HEIC for high-efficiency storage (if your workflow supports it)
Step 3: Adjust quality (only for certain formats)
On the page you’ll notice an Image Quality section. The tool clearly explains that this control only applies to specific formats: JPEG, WEBP, and HEIC. If you choose PNG, GIF, BMP, TIFF, etc., the quality slider may be ignored (because those formats don’t use the same kind of quality setting).
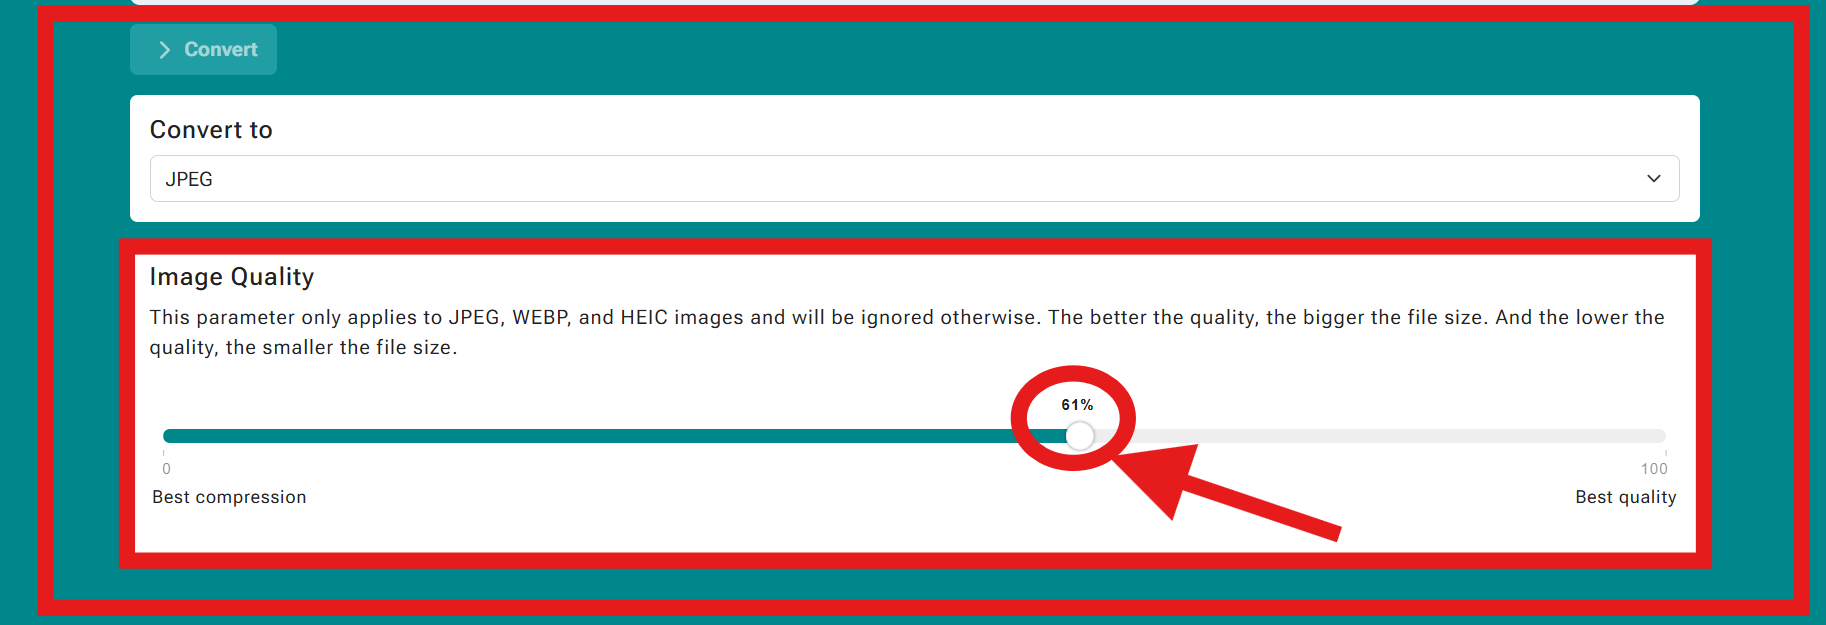
If you’re not sure what value to pick, don’t worry—there’s a practical rule of thumb:
- 40–60%: Good for everyday web images, blog posts, general sharing
- 60–80%: Better quality for product photos, portfolios, and images where detail matters
- 80–95%: High quality, larger files; useful when you want minimal visible compression
You can always run a quick test: convert once at a mid-level value, check the result, then convert again if needed. The goal is not “max quality at any cost.” The goal is “the smallest file that still looks great.”
Step 4: Click Convert
After you’ve uploaded your images and selected the output format (and quality if applicable), it’s time for the main action: click the Convert button.
Behind the scenes, the converter takes your uploaded image data, applies the format rules you selected (and any quality settings when available), and generates the new file(s). For a small image, this can feel instant. For large images or batch conversions, it may take a bit longer.
Understanding the Image Quality Slider
The Image Quality slider is one of the most valuable controls on the page—because it directly affects both file size and visual clarity. But it’s important to understand what it does (and what it does not do).
What the slider actually changes
For formats like JPEG, WEBP, and HEIC, “quality” usually means the compression level. When you lower the quality:
- The file gets smaller (faster upload, faster page load, easier sharing).
- Some fine detail may be discarded, which can cause softness or small artifacts—especially around text or sharp edges.
When you raise the quality:
- The file gets larger.
- The image keeps more detail and looks closer to the original.
How to choose the “right” quality
The “right” value depends on where the image will be used:
For websites
If the image is going on a website, especially in articles or product pages, aim for the smallest size that still looks good. A quality around 55–75% is a common sweet spot for JPEG/WEBP. If the image contains text (like a UI screenshot), you might push quality higher or use PNG if you need razor-sharp letters.
For social media
Social platforms often compress images again. That means if you upload already heavily compressed images, quality can degrade. For social media, a slightly higher setting (like 70–85%) can help preserve clarity after the platform re-encodes it.
For email and messaging
If you’re sending images via email or messaging apps, you usually want smaller files. A mid-level quality (around 50–70%) often looks great on phones while keeping the file lightweight.
For printing
Printing benefits from higher quality, but printing also depends on resolution (pixel dimensions). If the image is high resolution, choose a higher quality (often 80–95%) when converting to JPEG/HEIC/WEBP—unless you’re using formats optimized for print workflows (like TIFF or PDF).
Downloading Results (Single File or ZIP)
Once conversion is done, tarual.com shows a results panel where you can download your converted image. The interface is designed to make the next step obvious: get the file and move on.
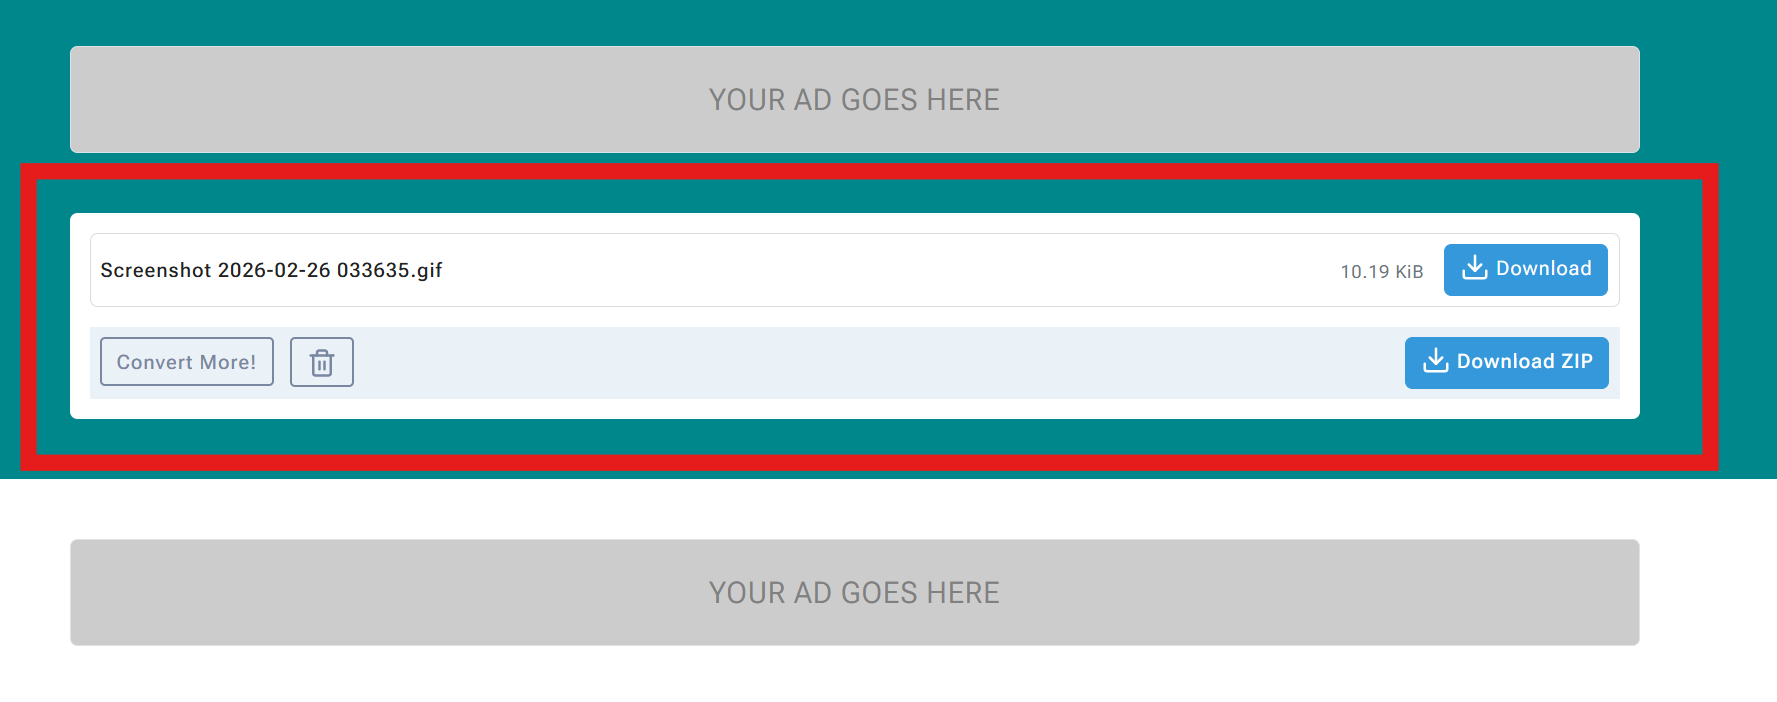
Download (single file)
If you converted one image, the Download button is usually the fastest option. Click it and save the new file to your device. The file name displayed in the results (for example, something ending in .gif or .jpeg) helps confirm you got the format you selected.
Download ZIP (multiple files)
If you uploaded and converted multiple images, downloading them one by one would be annoying. That’s why the tool offers a Download ZIP option: it packages your converted images into a single ZIP archive so you can download them all at once.
After downloading, you can unzip the file on Windows, macOS, or Linux. Most systems can extract ZIP files by default (right-click → Extract), and you’ll see all the converted images inside.
Convert More and clearing results
The results panel also includes a Convert More! button and a trash/delete icon. These are useful when you want to:
- Run another batch conversion immediately
- Try a different output format
- Change quality and re-test
- Clean up the workspace before uploading new files
Best Practices for Great Results
Converting images is easy—but converting images well is what makes your site faster, your posts look cleaner, and your workflow smoother. Here are practical best practices you can follow every time you use the tool.
1) Pick the right format for the job
- Photos: JPEG or WEBP
- Logos, icons, transparent backgrounds: PNG or WEBP
- Web performance optimization: WEBP (when supported)
- Animations: GIF (or video formats elsewhere if you need high quality)
- Icons for apps/favicons: ICO
- Documents/printing/sharing as “one file”: PDF
- Professional/print workflows: TIFF (when required)
2) Use the quality slider strategically
If you’re converting to JPEG/WEBP/HEIC, don’t blindly choose 100%. Start around 65%, then adjust:
- If the image still looks great and you want smaller size, move left a bit.
- If you see visible artifacts (blocky edges, banding, muddy details), move right.
3) Be careful with text and screenshots
Screenshots with text (like UI captures) can look blurry when saved as low-quality JPEG. If your image contains lots of text:
- Prefer PNG for maximum crispness, or
- Use WEBP with higher quality settings.
4) Keep an eye on file size for web publishing
Big images slow pages down. If you’re preparing images for a website, aim for practical sizes:
- Thumbnails: usually under a few hundred KB
- Blog images: often 100–400 KB depending on dimensions and content
- Hero banners: try to keep them under 500 KB if possible
The “perfect” size depends on your design and resolution, but the main goal is the same: keep pages fast without making images look ugly.
5) Batch convert when you can
Since the tool supports up to 10 images per upload (as shown in the upload area), take advantage of that. Convert sets of images together—product photos, blog illustrations, or a folder of screenshots. Then download them as a ZIP to save time.
Troubleshooting Common Problems
Most conversions are smooth, but if something feels “off,” it’s usually an easy fix. Here are the most common issues and what to do.
Problem: My image doesn’t upload
First, confirm you’re within the tool’s limits. The upload area mentions up to 10 images and a maximum size (shown as “Max size is 1024MB”). If your file is extremely large, try a smaller image or reduce resolution first.
- Try refreshing the page and uploading again.
- Try a different browser (Chrome/Edge/Firefox).
- Disable browser extensions that might block uploads (ad blockers sometimes interfere).
- Make sure you didn’t select more than 10 images in one batch.
Problem: I clicked Convert but nothing happened
Usually this is one of these causes:
- No file finished uploading yet (wait for “Upload complete”).
- No output format selected (choose one in “Convert to”).
- A temporary browser hiccup (refresh and retry).
Problem: The quality slider doesn’t seem to change anything
That can be normal. The page explains that quality only applies to JPEG, WEBP, and HEIC. If you selected PNG, GIF, BMP, TIFF, ICO, PDF, PSD, or AI, the slider may be ignored by design. Switch the “Convert to” format to JPEG/WEBP/HEIC, then adjust the slider and convert again to see the difference.
Problem: My PNG lost transparency
Transparency is not supported by JPEG. If you convert a transparent PNG to JPEG, the transparent area is replaced with a solid background. If you need transparency, choose PNG or WEBP as the output format.
Problem: The file looks blurry after converting
This usually happens when:
- You converted to JPEG/WEBP/HEIC with a low quality setting.
- The original image was already low resolution.
- The image contains text/screenshot content where JPEG compression is more noticeable.
Fix: Increase quality (move the slider right) for JPEG/WEBP/HEIC, or choose PNG for text-heavy images.
Problem: I can’t find the downloaded file
Check your browser’s download bar or the default “Downloads” folder. The results area shows a clear Download button, and you can often click the download indicator in your browser to “Show in folder.”
FAQ
How many images can I convert at once?
The upload area indicates you can drop up to 10 images at a time. If you have more than 10, convert them in multiple batches.
What’s the max file size?
The upload panel displays a maximum size note (shown as “Max size is 1024MB” in the screenshot). If an upload fails, check your file size and try smaller batches.
Which format is best for website speed?
Usually WEBP is a strong choice because it’s designed for efficient compression and good quality. JPEG can also be good for photos. PNG is best when you need transparency or super crisp text, but it can be heavier.
Why is there an Image Quality slider if I’m converting to PNG?
The page notes that quality applies only to JPEG, WEBP, and HEIC. For other formats, the slider is ignored. If you want quality control, switch output to one of those formats.
Can this convert images into PDF?
Yes—PDF appears in the “Convert to” list. This is useful when you need to send an image as a document, print it, or upload it to a system that accepts PDF files.
Can I download everything in one click?
Yes. After converting multiple files, you can use Download ZIP in the results panel to get all outputs at once.
Last tip: If you’re using the Image Converter as part of a workflow (website publishing, product uploads, social posts), build a simple habit: upload → pick format → adjust quality if needed → convert → download → spot-check one result. That 10-second check saves you from publishing blurry images or heavy files.
YOUR AD GOES HERE